
Too Long; Didn't Read
Standard window A/C units don't fit casement windows because the sash swings outward on a crank. The most reliable fix is a custom-cut plexiglass (acrylic) insert panel that replaces your screen, accepts a portable A/C exhaust hose, and seals tight without permanent modifications. Budget options like corrugated plastic or fabric seal kits also work, but they sacrifice durability or aesthetics. Purpose-built casement slider A/C units exist too, though selection is limited in Canada. This guide walks through every viable option so you can cool your Toronto home without ripping out your windows.
Answer first: You cannot install a standard window A/C unit in a casement window—it will fall out. The best solution for most Toronto homeowners is a portable A/C paired with a custom plexiglass (acrylic) insert panel that replaces your screen, accepts the exhaust hose, and seals without permanent modifications. It installs in under ten minutes and costs $80–$200 CAD.
Every July, the same panicked search lights up Toronto: casement window air conditioner. The person typing it just hauled a brand-new window unit up three flights of stairs, set it on the sill, cranked the window open, and watched the whole arrangement swing outward like a door trying to leave the conversation.
That's the fundamental problem. Casement windows hinge on the side and crank outward. There's no sliding sash to brace a unit against. No lip to rest it on. Just open air and gravity, and gravity is undefeated.
I've spent years working on windows across the GTA—replacing them, repairing them, explaining to frustrated homeowners why their perfectly good casements won't cooperate with a $300 cooling appliance. This guide covers every viable approach I've seen, from the quick-and-dirty to the properly engineered, so you can pick the one that matches your budget, your building, and your tolerance for summer misery.
Why Standard A/C Units and Casement Windows Don't Get Along
Let's be specific about the mismatch, because understanding it matters for choosing the right fix.
A traditional window air conditioner is wider than it is tall. It sits on the windowsill, with the indoor half hanging inside and the outdoor half hanging outside. The window sash closes down on top of it, sandwiching the unit in place. Foam strips and side panels seal the gaps. The sash's weight and friction keep everything locked.
Casement windows throw every piece of that design out the—well, out the window.
No horizontal sash. The entire pane swings outward on a hinge, usually operated by a crank mechanism at the bottom. There is nothing to close down on top of a unit.
No sill ledge. Most casement frames are flush or nearly flush with the wall. There's no protruding sill to rest 60 pounds of compressor on.
Outward swing clearance. Even if you could somehow wedge a unit in, the window would need to close against it from the outside. The geometry simply doesn't work.
Quotable nugget: "Casement windows and standard A/C units are a geometry problem with no solution—you can't brace something against a door that opens away from you."
This is why every "casement window air conditioner" search eventually leads to one of three categories: portable A/C units with custom vent panels, purpose-built casement A/C units, or window replacement. Let's break each one down.
Option 1: Portable A/C with a Plexiglass Insert Panel (The Best Solution for Most People)
This is the approach I recommend to about 80% of the homeowners who ask. It's clean, reversible, effective, and doesn't require you to touch the window frame.
How It Works
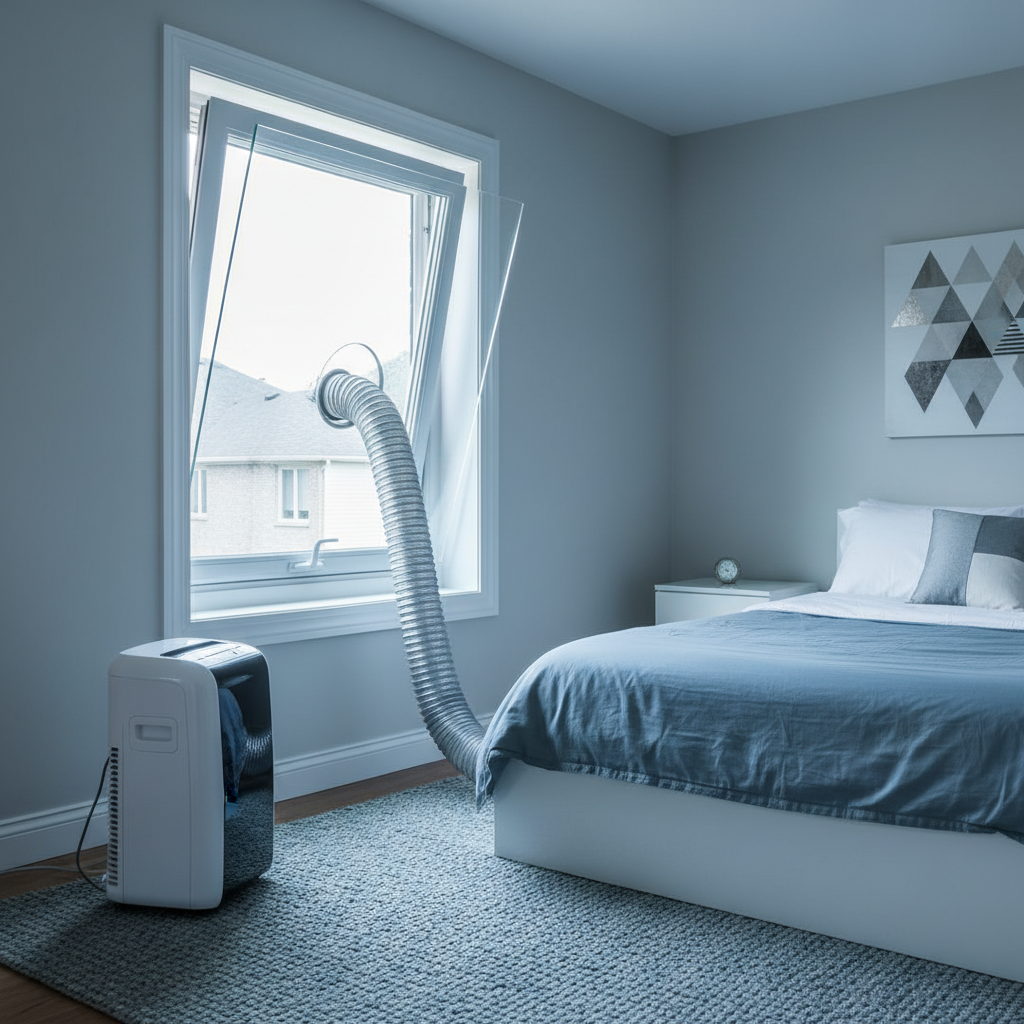
A portable air conditioner sits on the floor inside your room. It pulls in warm air, cools it, and pushes the heat out through a flexible exhaust hose—usually 5 inches in diameter. That hose needs to vent outside through something.
The problem is that the window kits bundled with portable A/C units are designed for sliding windows. They're flat panels that extend horizontally or vertically to fill the gap in a half-open slider. They don't fit a casement opening at all.
The plexiglass insert solves this. It's a sheet of clear 1/4-inch cast acrylic, custom-cut to the exact dimensions of your window frame, with a circular hole pre-cut to accept the exhaust hose. You remove your window screen, pop the acrylic panel into the frame, feed the hose through, and you're cooling.
Why Plexiglass Specifically
I've seen people try cardboard, plywood, foam board, and bed sheets. Here's why acrylic wins:
- It's transparent. You don't lose your natural light, which matters in condos and apartments where every window counts.
- It's rigid. A quarter-inch of cast acrylic doesn't flex in wind. Cardboard collapses. Foam board bows. Plywood holds but blocks all light.
- It's waterproof. Toronto gets heavy rain. Cardboard dissolves after one storm. Corrugated plastic survives moisture but yellows fast in UV.
- It's durable across seasons. A good acrylic panel lasts years. Store it in a closet over winter, reinstall it in May. Same panel, same fit.
- No permanent modifications. No screws into the frame. No drilling. No landlord complaints. Most panels friction-fit or use removable adhesive strips.
Where to Get One
Several companies make custom acrylic insert panels for casement windows:
- Martinson Manufacturing — one of the biggest names in this space, CNC-cuts panels to your exact measurements, ships in 5–7 days. They offer single-hose and dual-hose configurations.
- TAP Plastics — west coast outfit with online ordering available in Canada.
- Plexiguards (Vancouver) — a Canadian option that cuts custom A/C panels from clear acrylic.
- Klo Lab — another CNC fabrication shop offering custom portable A/C plexiglass panels.
Expect to pay $80–$200 CAD depending on your window size and the vendor. That sounds steep for a sheet of plastic, but consider that you're buying years of reuse and a tight seal that actually preserves your cooling efficiency.
Installation: 10 Minutes, No Tools
- Measure your window opening. Remove the screen and measure the interior frame dimensions—height and width. Measure twice. Casement frames are not always perfectly square, especially in older Toronto homes.
- Order your panel. Provide the exact dimensions and your exhaust hose diameter (usually 5 inches, but check your specific unit).
- Remove the screen. Most casement screens pop out with tabs or clips.
- Set the panel. Slide the acrylic insert into the frame where the screen sat. It should fit snugly.
- Seal the edges. If there's any gap, use removable weatherstrip tape or adhesive-backed foam. Don't use silicone caulk unless you want this to be permanent.
- Connect the hose. Feed your portable A/C exhaust hose through the pre-cut hole. Most panels include a hose coupler or you can use the one from your A/C's original window kit.
- Close the window. Crank the casement closed against the panel. The window's own seal presses against the acrylic.
Quotable nugget: "A properly fitted plexiglass insert turns your casement window into a sealed vent in ten minutes—no drill, no landlord drama, no lost daylight."
The DIY Route: Cutting Your Own Panel
If you're handy and want to save money, you can buy a sheet of 1/4-inch acrylic from a plastics supplier or Home Depot and cut it yourself. Fair warning: acrylic cracks if you rush it. Score it with a straight edge and snap it, or use a jigsaw with a fine-tooth blade at low speed. For the circular hose hole, a hole saw on a drill works, but go slow and keep the protective film on until you're done cutting.
A building engineer I spoke with recommended corrugated plastic (Coroplast) as a budget-friendly alternative. It costs under $25, cuts with a utility knife, and handles rain without flinching. The trade-off: it's opaque, it looks like a campaign sign, and it won't last more than a season or two in direct UV.
Option 2: Fabric Window Seal Kits (The Renter's Quick Fix)
These kits are essentially zippered fabric covers that attach to your window frame with adhesive Velcro. You open the window, the fabric stretches across the opening, and you feed the exhaust hose through a zippered slit.
Pros
- Cheap. Most kits cost $30–$60 CAD on Amazon.
- Fast. Installation takes about 15 minutes the first time, 30 seconds after that.
- Reversible. Peel off the Velcro strips and the window goes back to normal.
- The window still opens. You can crank it out with the fabric in place.
Cons
- Air leakage. Fabric doesn't seal as tightly as acrylic. Hot air sneaks in around the zipper and along the Velcro edges, making your portable A/C work harder.
- Wind vulnerability. A strong gust can peel the fabric away from the frame, especially on higher floors. Toronto's lake-effect wind is no joke.
- Aesthetics. It looks like you taped a shower curtain to your window. If that doesn't bother you, great. If it does, go with acrylic.
- Durability. The adhesive weakens over time, especially with heat cycling. Most kits last one to two seasons before the Velcro stops sticking.
Popular options include the IKSTAR 300CM seal kit (fits casement, crank, and awning windows up to 118 inches perimeter) and the Renogy Window Seal Kit. Both are available on Amazon.ca.
Fabric seal kits are a perfectly fine stopgap—say you're renting for one summer, or you need cooling this weekend and can't wait for a custom panel to ship. But for a permanent or semi-permanent setup, plexiglass is the better investment.
Option 3: Purpose-Built Casement Window A/C Units
These do exist. They're taller and narrower than standard window units, designed to fit the vertical orientation of casement and slider windows. They mount with a bracket that screws into the window frame or the exterior wall.
What's Available in Canada
The selection is thin compared to standard window units, but you can find a few models:
- Perfect Aire 10,000 BTU Casement/Slider — available at Home Depot Canada, fits openings 15 to 24 inches wide and 19.5 inches tall minimum. Around $500–$600 CAD.
- Keystone 10,000 BTU Slider/Casement — similar specs, available at Wayfair Canada and some independent retailers.
- Frigidaire Slider/Casement models — Frigidaire periodically offers 8,000–10,000 BTU casement units through Canadian Appliance and other retailers.
The Catch
These units still require a mounting bracket, and that bracket usually needs to be attached to the exterior of the house or the window frame itself. On a ground-floor window, that's straightforward. On a second or third floor, you're looking at ladder work or hiring someone.
For renters, the bracket installation is often a deal-breaker—your landlord may not approve screwing hardware into the frame. And if your casement window has a stripped crank operator that doesn't hold properly, a heavy A/C unit on the frame just adds stress to hardware that's already failing.
Quotable nugget: "A casement A/C unit only works if the window frame is solid enough to hold it. If your crank is already stripped, you're bolting weight onto a problem."
Option 4: The Nuclear Option—Replace the Window
Sometimes the best casement window air conditioner solution is to not have casement windows anymore.
If your casements are 20+ years old, drafty, fogged between the panes, or equipped with crank mechanisms that have seen better decades, replacement starts to make more financial sense than working around the problem.
Swapping to double-hung or horizontal slider windows gives you full compatibility with any standard window A/C unit. You also get:
- Better energy efficiency from modern Low-E glass and multi-point locks
- Easier cleaning (double-hungs tilt inward)
- A wider selection of A/C units at lower price points
- Improved resale value
Toronto homes built between the 1970s and 1990s often have casement windows that are approaching the end of their functional life. The seals fail, the crank operators wear out, and the frames warp just enough to make them hard to close. At that point, you're not just solving an A/C problem—you're solving a building envelope problem.
If you're considering this route, it helps to know what sizes you're working with. Our standard window sizes guide for Canadian homes breaks down the common dimensions and what to expect when ordering replacements.
We handle residential window replacement across the GTA—including swapping casements for double-hungs or sliders that play nicely with air conditioning. If your windows are already giving you grief beyond just the A/C issue, it might be time to have that conversation.
Sizing Your Portable A/C: Quick Reference for Toronto Homes
Whichever venting method you choose, the portable A/C unit itself needs to be sized correctly for your room. Undersized units run constantly without cooling. Oversized units short-cycle and leave the room clammy.
| Room Size (sq ft) | BTU Rating | Typical Use |
|---|---|---|
| 150–250 | 8,000 | Bedroom, home office |
| 250–350 | 10,000 | Living room, large bedroom |
| 350–450 | 12,000 | Open-concept living/dining |
| 450–550 | 14,000 | Large open space, loft |
Add 10% if the room gets direct afternoon sun. Add another 10% if the ceiling is over 9 feet. Toronto's humidity means you also want a unit with a decent dehumidification rating—look for at least 2 pints per hour for bedroom-sized rooms.
Dual-hose vs. single-hose: Dual-hose portable units are more efficient because they pull intake air from outside rather than creating negative pressure in the room. They cost more and need a panel with two holes instead of one, but the energy savings are real—especially in a Toronto summer where you're running the unit 10+ hours a day.
Common Mistakes I See (And How to Avoid Them)
Leaving gaps around the insert. Even a quarter-inch gap around your plexiglass panel lets humid Toronto air pour in. Use weatherstrip tape on every edge. It costs $5 and saves you real money on electricity.
Forgetting the drain. Most portable A/C units produce condensation. Some auto-evaporate it through the exhaust hose, but many have a drain pan or plug. If you don't empty it—or plumb it to a drain—the unit shuts itself off mid-heatwave.
Ignoring the exhaust hose length. The shorter the hose, the better the unit performs. Every extra foot of hose adds heat back into the room. Don't coil excess hose behind furniture. If the included hose is too long, cut it to length (carefully).
Blocking the intake. Portable A/C units need airflow around them. Don't shove it into a corner with curtains draped over the intake grille. Leave at least 18 inches of clearance on all sides.
Running a portable A/C with the window wide open. I've seen this more than once. The panel replaces the screen—the casement window should be closed (or barely cracked) against the panel to maintain the seal. If your crank mechanism won't fully close, that's a separate repair issue. Check our guide on fixing a stripped casement window crank operator before you spend a summer fighting it.
What About Ductless Mini-Splits?
If you're a homeowner (not renting) and you're tired of seasonal workarounds, a ductless mini-split is the permanent answer. It mounts on the wall, connects to an outdoor compressor through a small hole in the wall, and delivers both heating and cooling without touching your windows at all.
Mini-splits are more expensive upfront ($2,500–$5,000 CAD installed for a single zone), but they're dramatically more efficient than portable units, whisper-quiet, and they don't block any window. For Toronto homeowners who plan to stay in their home for five or more years, the payback math works.
That said, a mini-split is an HVAC project, not a window project. If your casements are otherwise fine and you just need summer cooling, the plexiglass insert route gets you there for a fraction of the cost.
The Bottom Line
Casement windows are great for ventilation and aesthetics. They're terrible for air conditioning. But you don't have to choose between your windows and your comfort.
For most Toronto homeowners and renters, a portable A/C unit paired with a custom plexiglass insert panel is the sweet spot. It's effective, it's reversible, and it doesn't require modifying your window or your lease. Order the panel in April, install it in May, and spend the summer arguing about something other than the thermostat.
If your casement windows are already on their last legs—cranks stripped, seals shot, fog between the panes—a full window replacement kills two birds with one project. New double-hungs or sliders accept standard A/C units, improve your energy bills, and bump your home's resale value.
Whatever you choose, don't try to jam a standard window A/C unit into a casement frame. Gravity will win that argument every time.
Struggling with casement windows that won't seal, won't crank, or just won't cooperate with your cooling plans? We help Toronto homeowners with window repairs and full replacements across the GTA. Book a free assessment and we'll tell you whether a repair or a swap makes more sense for your situation.